Monthly Archives: January 2013

Roasted Veggie Tacos

This post is more about an idea than a recipe. I don’t have any exact ingredients or measurements for you today. Instead, this post is about experimenting and finding out what works for you.

Last winter, Bobby and I got on a roasted vegetable kick. We were literally roasting vegetables almost daily and then using them in different ways. These tacos were my idea, and they turned out great! We hadn’t made them in a while, so we gave them another shot last night. We used different produce from the first time we made these so the taste was not quite the same, but the result was just as satisfying.

To me, there are few things as delicious as roasted vegetables. I could eat a plate of rich, caramelized vegetables for dinner and be a happy camper. Basically, that’s what you’re doing here, with the added benefit of toppings and a tortilla.

Here’s what we do to make these tacos:

  1. We go to the store and select produce. We buy what looks good and obviously what’s available. For example, last February (see picture below), we used zucchini. Last night, there was no zucchini to be found at Mariano’s. We did find yellow squash, but it was quite expensive so we scrapped the zucchini/squash idea entirely. We subbed in Chinese eggplant instead. We also buy tortillas and toppings.
  2. We cut the produce, if necessary. Usually, we buy pre-cut portabella mushrooms, but you could buy whole mushrooms and cut them yourself. The smaller you cut the vegetable, the less time it will take to roast. But don’t go too small because the vegetables will easily burn. Aim for bite-size pieces. Also, I’m sure it goes without saying, but try to cut each type of vegetable uniformly. All mushrooms should be generally the same size, all zucchini should be generally the same size, and so on.
  3. We decide which vegetables we want to roast together on the same pan and put them in a bowl. We make this decision based on how long it takes to roast them. Last year, I purchased The Roasted Vegetable (find the cookbook here on Amazon), and it includes a table of roasting times and temperatures for various vegetables. Last night, I roasted onion, corn, and mushrooms on one pan, and both the Brussels Sprouts and Chinese eggplant on separate pans.
  4. We combine the vegetables with olive oil, salt, and pepper. I’ve stopped measuring out the olive oil when I do this step, but be sure not to saturate the vegetables. You want them lightly coated. Although olive oil contains healthy fats, you don’t want to go overboard.
  5. We spread the vegetables in a SINGLE LAYER on a baking sheet or other cooking vessel. If you want your vegetables to get nice and brown, they cannot be too crowded in the pan. As such, the single layer is very important. If you have too many vegetables, spread them out over various pans or roast in batches. I’ve used baking pans, lasagna pans, Pyrex dishes, etc.
  6. We roast! Last night, we ended up roasting all our vegetables at 450 degrees for 30 minutes. We had not anticipated that they would all take the same amount of time. The Roasted Vegetable recommended 20-25 minutes for the eggplant, but they weren’t done after 20 minutes.
  7. We top our tacos. Sometimes we toast our tortillas first, but last night we skipped this step because we were quite hungry. Instead, we put them in the microwave for 15 seconds. Here is how I created my taco: 1) I spread a big dollop of plain, zero percent fat Greek yogurt on the tortilla; 2) I spread a heaping spoonful of veggies on the tortilla; and 3) I covered the veggies with crumbled goat cheese, a couple slices of avocado, and a squirt of Sriracha.
  8. We enjoy! After two of these tacos, I feel super fulfilled.

Here are a couple pictures of my tacos. Be sure to click on them for a better look!

Roasted Veggie Tacos 1

These are the tacos I made last February. Roasted vegetables: yellow onion, asparagus, Brussels sprouts, zucchini, portabella mushrooms. Toppings: sour cream, queso fresco, toasted pumpkin seeds, Sriracha.

Roasted Veggie Tacos 2

These are the tacos I made for lunch today. (Sorry for the orientation problem; WordPress seems not to want this picture to be horizontal.) Roasted vegetables: red onion, Brussels sprouts, portabella mushrooms, Chinese eggplant, corn. Toppings: Greek yogurt, toasted pumpkin seeds, Sriracha, avocado. I forgot the goat cheese today, but they were still tasty.

Enjoy!

Pistachio & Broccoli Pesto-Crusted Salmon

For a long time, I’ve been afraid to cook fish. It dries out so easily and so quickly. But it’s so healthy and so delicious! Oh, the dilemma. In the past, I would just make Bobby cook our fish dinners. As a result, I only cooked fish one other time before tonight. I’ll let you have one guess as to how my first foray with fish turned out… yeah, that’s right… DRY and gross.

Today, I was finally ready to give fish another try. I found this recipe for Pistachio & Broccoli Pesto-Crusted Salmon featured in the January 2013 issue of Shape magazine. I was drawn to this recipe for two reasons: 1) I thought I would enjoy the flavors; and 2) it looked easy to make. After having prepared this dish, I am happy to report that it was both simple and tasty.

I’m sorry to say that I could not easily find the recipe on the Shape website. However, if you are interested, it is from Jessica Goldman Foung’s new book, Sodium Girl’s Limitless Low-Sodium Cookbook (find the cookbook here on Amazon.com).

Here’s the recipe (adapted from original):

  • 3/4 cup unsalted pistachios, removed from shells
  • 1-3 garlic cloves (depending on how much you like garlic)
  • 2/3 cup broccoli florets, stems trimmed
  • 1 cup fresh basil leaves
  • 2 tablespoons olive oil
  • 1 tablespoon pine nut or walnuts
  • Salt and freshly ground black pepper to taste
  • (4) 3-to-4 ounce salmon filets (or 4 boneless, skinless chicken breasts if you want chicken)
  • Lemon wedges
  1. Preheat oven to 375 degrees. Line a baking sheet with parchment paper and set aside.
  2. Put the pistachios in a food processor and pulse until roughly chopped. Transfer to a bowl and set aside.
  3. Put the garlic, broccoli, basil, olive oil, pine nuts/walnuts, salt, pepper, and 1 teaspoon water in the food processor and pulse until it becomes a thick, chunky puree. Add more water if necessary.
  4. Place the salmon fillets on the parchment paper, skin-side down. Using a spoon or spatula, evenly distribute the pesto over the fillets. Top each with a quarter of the crushed pistachios. Bake for 10 to 12 minutes or until the salmon is just pink. (Bake for 25 minutes if you chose to make chicken.)
  5. Squeeze the lemon wedges over top of the salmon fillets.

The original recipe calls for pine nuts, but they are expensive, and I already had walnuts in the pantry so I used them instead. You could also try sunflower seeds if you have those on hand.

The recipe also called for only one garlic clove, but I added two small ones and one large one to the pesto. I did not think the garlic was too overpowering, and neither did Bobby.

I added salt and pepper to the pesto, even though the original recipe did not call for either one. The recipe is from a book focused on lowering your sodium intake so if that is your goal, omit the salt. I would suggest adding pepper regardless.

Rather than overcook the salmon, I checked it at eight minutes to see how close it was to being done. It needed more time so Bobby suggested cooking for three more minutes. In retrospect, I should have cooked it a minute or so more because the filets were rather thick. But it is better to undercook than overcook salmon!

Unlike the original recipe, I finished by squeezing fresh lemon over the salmon filets because I thought they could use a bit of brightness.

In conclusion, this recipe was a cinch to prepare and quite tasty for how healthy it is. Lots of protein, healthy fats, and antioxidants here.

Enjoy!

Pistachio & Broccoli Pesto-Crusted Salmon

Turkey Burgers

As a child, I always hated when my mom made turkey burgers (sorry mom). I can’t pinpoint a particular reason why, but the aversion stuck with me for a long time; I’ve not had a turkey burger in years. But Bobby and I are always looking for new meals to try so I decided to give them another shot after I found a simple recipe.

The recipe I used is from a book called Best-Ever 400 Budget Recipes edited by Lucy Doncaster (find the cookbook here on Amazon.com). I was drawn to this recipe because it seemed unique – the turkey is mixed with lime zest and juice, red onion, and thyme leaves. I served the burgers on toasted whole wheat English Muffins with Sriracha mayo (3 tablespoons mayo, 1 tablespoon Sriracha), caramelized red onions, lettuce, and avocado. They had a nice bit of spice from the Sriracha, you could actually taste the lime, and they weren’t dry. A win in my book.

The burgers I sculpted were small (the size of the English Muffins), but they were surprisingly filling. Both Bobby and I ate two. I know that’s more than the recommended serving of protein per meal, but such is life.

Here’s the recipe:

  • 1 1/2 pounds ground turkey
  • 1 small red onion, finely chopped
  • Zest and juice of 1 lime
  • Small handful of fresh thyme leaves
  • Extra virgin olive oil
  • Salt
  • Freshly ground black pepper
  1. Mix the turkey, onion, lime zest, lime juice, thyme, salt, and pepper in a bowl.
  2. Cover the bowl with plastic wrap. Put the bowl in the refrigerator for up to 4 hours.
  3. After mixture has chilled, divide it into equal portions and shape into round patties.
  4. Heat a griddle pan over medium heat. Brush the patties with oil on one side. Place the oiled side on the pan and cook for 10 minutes.
  5. Brush the second side with oil and flip the patties. Cook for 10 minutes or until cooked through (165 degrees for poultry).

PREPARATION:

Turkey: To prevent my turkey burgers from being too dry, I didn’t purchase extra-lean turkey. I just bought the regular old turkey that has some fat in it. While cooking, a lot of the fat rendered off anyway.

The original recipe suggests not leaving the mixture to chill in the fridge for more than four hours. I let mine chill for a couple hours, but I didn’t cook all the patties and will be making the rest today. As such, they’ve chilled for lots of hours.  I don’t anticipate any problems with the additional chilling, but I’ll report back later if I encounter any issues.

Onion: I purchased a larger red onion from Trader Joe’s. I used slightly more than half of the onion for the burgers, and I caramelized the remainder for a topping. Don’t feel like you have to use an entire onion for this dish. If you’re not a big onion person, use less. When I felt there was enough onion in the mixture, I stopped adding it in.

Thyme: Same goes with the thyme.

Lime: But don’t skimp on the lime. It added a really nice flavor.

COOKING:

The original recipe simply told me to preheat my griddle without any indication of at which heat I should do so. This, I do not like. But after some Googling, I settled on a medium flame. Well, at first I started slightly lower, and then I moved up to medium. Do not start with your temperature too high as this can dry out your burgers. My first batch of burgers didn’t cook as quickly as my second batch; the second actually got nice grill marks too. So maybe try only one or two burgers for the first batch to let the pan really heat up/see how long it takes to cook them, and then carry on with the rest.

I cooked for 10 minutes on the first side and less than 10 on the second side. I can’t give you an exact time for the second side because for as much as I tried to create equal patties, they weren’t perfect. Just have your meat thermometer handy, and once the pink drains from the turkey, take the temperature often to see if you’re hitting 165 degrees. Again, you don’t want to overcook.

SERVING:

Like a regular burger, you can serve these with just about anything your heart (or stomach) desires.

Unfortunately, I don’t have any photos to share. It was one of those dinners where I was cooking and eating simultaneously. Close your eyes and imagine a burger. That’s what they looked like. Except they weren’t brown.

Enjoy!

**UPDATE**

I cooked the rest of the burgers. This time, before forming patties, I added the olive oil right into the mixture instead of brushing it on top. I thought the burgers were moister, and there was less mess in the griddle pan than yesterday. The mixture ended up being enough for nine small burgers total.

Turkey Burgers

The burgers I made today were thicker than the burgers I made yesterday. The burger pictured on the top ended up needing 20 minutes to cook, and the burger on the bottom needed about 23 minutes.

I think the reason that the original recipe says not to chill the mixture for more than four hours is because the onion odor/taste tends to get really strong if you do. This recipe is probably best if you’re having guests and are planning to eat all the patties the same day. Otherwise, think about halving it.

Hope this update helps!

Citrus-Marinated Tofu with Onions and Peppers

Tofu… I know a lot of meat eaters absolutely cannot stand it, but I love it. If prepared well, it both tastes good and makes you feel like you’re doing something good for your body. Here is a dish that I think carnivores and herbivores alike can embrace: Citrus-Marinated Tofu with Onions and Peppers. In one word: Yum. Even Bobby – a lover of all slow-cooked meats – likes this tofu.

Like the last recipe I posted, this recipe comes from the Sheet Pan Dinners story in the March 2012 issue of Bon Appétit magazine. It is not difficult to make, but it does take me an hour or so from start to finish. (As I’ve mentioned, I’m quite slow in the kitchen. Someone with better skills could probably do this faster.) Nevertheless, the result is definitely worth the time it takes. All components of this dish are delicious – from the tofu to the roasted vegetables to the sauce. I’ve not yet tried it myself, but I think the sauce would make a nice salad dressing if you have some left over.

Here’s the recipe. I like to make additional tofu and vegetables, but I’ll talk about that below. What I’ve included here is what’s called for in the original recipe:

  • 3/4 cup chopped fresh cilantro, divided
  • 2/3 cup fresh lime juice (4-5 limes, depending on size)
  • 1/4 cup minced garlic (10-12 cloves, depending on size)
  • 3 1/2 teaspoons ground cumin, divided
  • 3/4 teaspoon smoked paprika, divided
  • Kosher salt, freshly ground pepper
  • (1) 1-pound block firm tofu, cut into 1/2-inch-thick slices
  • 4 tablespoons extra virgin olive oil, divided
  • 1 tablespoon honey
  • 1 medium red onion, cut into 1/4-inch-thick rounds
  • 3 red bell peppers, cored, seeded, cut into 1/4-inch-thick slice
  1. Preheat oven to 450 degrees. Line a large rimmed baking sheet with foil. (If you decide to make additional tofu and/or vegetables, you will likely need two baking sheets).
  2. Combine 1/4 cup cilantro, lime juice, garlic, 3 teaspoons cumin, and 1/2 teaspoon paprika in a small bowl. Season with salt and pepper. Pour 1/2 cup of marinade into a resealable plastic bag. Add tofu to the bag and seal. Shake to coat. Let marinate at room temperature, turning occasionally, for 10–15 minutes.
  3. While you’re waiting, transfer the remaining marinade to a blender or food processor. Add 1/4 cup cilantro, 2 tablespoons oil, and honey, and puree until smooth. Season sauce with salt and pepper.
  4. Combine onion and peppers in a large bowl. Toss with remaining 2 tablespoons oil, 1/2 teaspoon cumin, and 1/4 teaspoon paprika. Season with salt and pepper.
  5. Drain tofu. Place in a single layer on one side of prepared sheet, and season with salt and pepper. Spread vegetables in a single layer opposite tofu. (If you’ve prepared more tofu and/or vegetables, you probably won’t be able to fit everything on one sheet. Put your tofu on one sheet and your vegetables on the other.)
  6. Roast, stirring vegetables occasionally, until vegetables are tender and tofu is lightly browned, 20–25 minutes.
  7. Divide among plates. Drizzle with sauce. Garnish with remaining 1/4 cup cilantro.

It is my experience that tofu is sold in 14-ounce blocks at grocery stores. Since there are 16 ounces in a pound, you’ll be a bit short of tofu as required by the original recipe. This, of course, is no big deal; your measurements won’t be perfect, but they don’t need to be. (Who am I throwing caution to the wind like this?) I usually end up buying two blocks and doubling the recipe.

The original recipe calls for tofu of medium firmness. For all the times I’ve made this dish, I’ve yet to find medium tofu at the store. It is always sold as either firm or extra firm. At first I was nervous; the recipe specifically said not to buy firm tofu. But, in a move very uncharacteristic of my cautious kitchen persona, I bought the firm anyway. And let me tell you, it was a good decision! As you know, tofu is soft. When you soak it in the marinade, it gets even softer and tends to fall apart. Even when it is firm, I always have a few tofu fatalities, pieces that crumble (but I cook and eat anyway). If the tofu was less firm, I’m pretty sure there’d be more than a few of these broken pieces. So, if you can find medium tofu, by all means, try it! But if not, there is no need to worry. Firm works better than fine.

When you remove the tofu from the marinade and transfer it to the baking sheet, the original recipe tells you to dump the rest of the marinade. Before I do that, I like to scoop out some of the bigger pieces of garlic and cilantro and scatter it on the tofu pieces. Then I toss the liquid.

When a recipe calls for a garnish, I usually end up skipping it, especially if it is something that’s not otherwise called for in the recipe. However, here, you actually use a bunch of cilantro in the recipe so you already have the garnish at your disposal. And given how much cilantro you get when you buy a bunch, you’ll likely have enough. And it makes the plate look pretty.

I hope some of you meat eaters will give this recipe a shot. You may not love it as much as I do, but I’m fairly confident that you will not hate it, and you might even like it a little. If you need a heartier meal, you can serve it with tortillas and rice.

Enjoy!

Citrus-Marinated Tofu with Onions and Peppers 1

Tofu and vegetables pre-roasting.

Citrus-Marinated Tofu with Onions and Peppers 2

Tofu and vegetables post-roasting.

Citrus-Marinated Tofu with Onions and Peppers 3

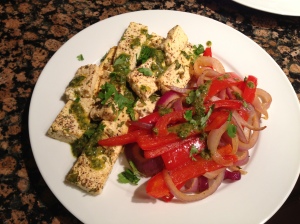
The finished product. Doesn’t it look delicious?

Parmesan Chicken with Caesar-Roasted Romaine

Call me crazy, but I don’t love chicken. I don’t crave it so I rarely order it at restaurants or make it at home. Most times, I find it to be too boring. Whenever Bobby has a hankering for chicken, a part of me wants to scream “no!” But we have found a few chicken dishes that we really enjoy and make on a regular basis. One of them is Parmesan Chicken with Caesar-Roasted Romaine from the March 2012 issue of Bon Appétit.

This recipe is part of a set of recipes meant to be prepared quickly and easily on one sheet pan. Given my limited skills, it’s not surprising these recipes caught my eye. Thankfully, this particular recipe is as delicious as it is easy to follow. To me, this dish is an updated take on the chicken Caesar salad, which I know many people enjoy. Since it is also attractive, it is perfect for a casual dinner party.

Here’s the recipe (adapted from original):

  • 4 (7-ounce) skinless, boneless chicken breasts or a package of chicken breast tenderloins
  • Salt
  • Freshly ground pepper
  • 1/2 cup grated Parmesan, Pecorino, or Asiago cheese (about 1 1/2 ounces)
  • 1/2 cup panko (Japanese breadcrumbs)
  • 3 tablespoons extra virgin olive oil, divided
  • 2 tablespoons flat-leaf parsley, chopped
  • 2 garlic gloves, chopped, divided
  • 1 or 2 large hearts of romaine, halved lengthwise
  • 1/2 of 1 lemon
  1. Preheat oven to 450 degrees. Line a large rimmed baking sheet with foil.
  2. Season chicken with salt and pepper, and place on the baking sheet.
  3. Combine the cheese, panko, 2 tablespoons oil, parsley, and 1 chopped garlic clove in a bowl. Season with salt and pepper.
  4. Pat panko mixture onto chicken, and roast until crumbs turn golden, about 10 minutes.
  5. Place romaine halves on baking sheet around chicken. Drizzle romaine with 1 tablespoon oil, and sprinkle with remaining 1 chopped garlic clove. Season with salt and pepper. Optionally, you may also sprinkle a bit of the remaining panko mixture on the romaine.
  6. Roast until chicken is cooked through and lettuce is browned at edges, between 5 and 10 minutes.
  7. Squeeze lemon over chicken and romaine.

My preparation differs from the original Bon Appetit recipe in a couple ways. First, I like to sprinkle the panko mixture not only on the chicken but also on the romaine. I don’t use a lot of the mixture on the lettuce; it only needs a small sprinkle for a little extra crunch.

Second, the original recipe suggests topping the roasted romaine with chopped anchovies. The first several times I made the recipe, I did just that. However, Bobby and I both agreed that the flavor of the anchovies was too overwhelming, and ever since, I’ve omitted this step. I think the romaine is perfectly tasty without the addition of the anchovies, especially if you sprinkle some of the panko mixture and lemon on top.

The recipe calls for chicken breasts, and the first several times I made it, I used chicken breasts. Then, one day, I accidentally purchased chicken breast tenderloins. Nevertheless, I used them in this recipe, and Bobby and I enjoyed the smaller pieces. They taste the same, obviously, but they cook faster than regular breasts! Now I use them all the time. If you use chicken breasts, be sure to monitor them closely because they may need to cook longer than the original recipe recommends. Make sure the chicken reaches 165 degrees before you serve it.

Two tips for your lettuce:

DRY YOUR ROMAINE. It must be completely dry before you roast it. When the lettuce is wet, it won’t roast properly, and the liquid on the leaves will turn any panko mixture on the pan to mush.

ROAST ONLY ONE HEART OF ROMAINE IF YOU’RE FEEDING TWO PEOPLE. The original recipe suggests roasting two hearts of romaine, but since Bobby and I usually only eat one heart in a seating (half for each of us), I now only roast one. That way, we don’t have to deal with soggy leftovers the next day. I save the remaining panko mixture in the refrigerator, and the next day, I apply it to the romaine (with a little olive oil, too) before roasting.

And I’ll leave you with this fun fact: Today, I made the connection between chicken tenderloins and the name “chicken tenders.” That only took 26 years. Wow.

Enjoy!

Parmesan Chicken with Caesar-Roasted Romaine 1

The panko mixture.

Parmesan Chicken with Caesar-Roasted Romaine 2

The chicken tenderloins prior to cooking.

Parmesan Chicken with Caesar-Roasted Romaine 3

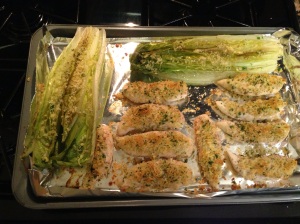
The chicken after about 18 minutes and the romaine after about 5 minutes of cooking.